Last Updated on September 16, 2022 by The Tutor
How to Install a Motion Sensor Security Light
A motion sensor light triggers a response when it detects motion within a certain range which makes it one of the best lighting options that promotes security and safety in your property.
Motion sensor security lights automatically illuminate your premises when you return home in the dark. As these lights turn on when they detect even subtle movements, they are essential if you want to discourage potential intruders.
How Do Motion Sensor Security Lights Work?
Motion sensor lights have motion detectors, which work like small electronic eyes that detect infrared energy or heat waves coming from moving objects. When the motion detector senses a moving object within its range, the lights will electronically turn on. Warmer moving objects like people, animals, and cars can be easily detected by the motion sensor because they radiate more heat waves. Sensors can detect a human being because they are typically sensitive to the temperature of a human body.
Usually, the light is sensitive to motion but not to a person who is standing still. This is because the sensor detects motion, not temperature. The electronics package attached to the sensor needs to detect a fairly rapid change in the amount of infrared energy to create a response. When a person or animal walks by, the amount of heat waves within the visibility range rapidly changes, making it easier for the sensor to detect it.
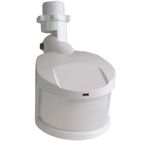
Picture of a motion sensor for a security light
Where To Install A Motion Sensor Security Light
Motion sensor security lights are ideally installed in all possible entrances to the house and typically over the garage doors. It’s best to put motion sensor lights six to 10 feet above the ground. The lights should be positioned to cover most movement across the sensitivity zone and not directly toward the sensor. You can install a motion sensor light to cover all paths leading to your front door, back door, windows, and the driveway so the light will automatically turn on when you come home at night.
Motion sensor lights are also used to illuminate decks, patios, and other hazardous locations such as around stairways and swimming pools. To discourage intruders, you can also install motion sensor security lights in fence gates, patio doors, yard, and the dark areas that lead to your house’s entrance.
How to Install a Motion Sensor Security Light
Before installing a motion sensor security light, it’s important to read the instructions that come with your lighting fixture and motion detector carefully. The installation process may vary depending on the type of lighting fixture and motion sensor used.
In most cases, you will need the following tools:
- Voltage tester
- Screwdriver
- Screws (these typically come with your fixtures)
- Nut caps
- Electrical tape
- Wire stripper/cutter
- Motion sensor
- Lighting fixture
Turn off the power that supplied the light fixture and follow the instructions below.
Replacing an Old Motion Sensor Security Light
Sometimes, you will need to replace your old motion sensor lights that no longer work properly due to weather and wear-and-tear. Perhaps you just want to get an upgrade and replace the old ones with a new model. Either way, here’s how to replace an old motion sensor light:
- Find the circuit that supplies power to the lighting fixture. Turn off the circuit breaker to cut off the electricity supply to your motion sensor light.
- Remove the light bulbs from the fixture.
- Check to make sure that no voltage is present. Using a voltage tester, place one test prong on the threads on the side of the socket and the other test prong on the center metal tab at the bottom.
- Use a screwdriver to remove the screws that cover the fixture to the base, then remove the cover.
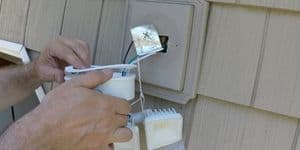
- You will then find the electrical wires that connect the light to your house’s electrical supply. Remove the two nut-coverings from the wires by turning the wire nut caps counterclockwise. If there’s electrical tape wrapped around the caps, remove the tape first.
- Make sure not to touch the bare wires until you test them. Use the voltage tester to check and make sure that the circuit is dead.
- When you’re sure that no voltage is present, begin to disconnect all the wires and remove the old fixture.
- If your motion detector is installed separately, unscrew and remove the old motion detector from your property.
- The installation process for outdoor lighting may vary depending on the type of lighting used and the brand. Make sure to carefully read and follow the instructions that came with your specific lighting fixture.
- Hang the watertight gasket over the supply wires.
- Before you attach the wires to the light fixtures, you need to install the bare copper ground wire to the green grounding screw on the inside of the new light. Form a loop in the wire in a clockwise direction to bind it to the screw as you tighten.
- Slide a wire nut over each pair of wires and twist the wires from the house to the matching color wire on the fixture (i.e. white to white, black to black, or as indicated in the instructions).
- Screw the wire nuts down tightly onto the twisted wires, then wrap electrical tape around the bottom of each nut. Make sure that the wiring connections are correct (refer to the instructions that come with your lighting product).
- Line up the watertight gasket to form a tight seal between the fixture and the electrical box. Attach the cover to the base using its screw and a screwdriver.
- Attach the light bulbs into the sockets. If you have a new LED fixture, you may not need to install light bulbs. Adjust the lights to cover the area you want to illuminate. You can adjust the angle of the fixture with a screw. Loosen it to change the angle and tighten it to lock.
- Set the motion sensor sensitivity and delay time. Refer to your sensor manual for specific instructions. The controls for sensitivity and delay time are usually found on the base of the motion sensor. Make sure to point the sensor to the area you want to cover.
- Turn the circuit breaker back on. Adjust the setting of the motion detector until the sensitivity and delay are just right for your preference.
- Test the light fixture at night to fine tune the distance at which point the fixture detects motion and for how long the light will remain on after being triggered.
You should always follow the instructions that come with the motion sensor security light that you purchased. Make sure the wires are in good condition and have been stripped properly. It is a good idea to wrap the wire nuts with electrical tape before pushing the back into the electrical box.
Wiring a New Motion Sensor Security Light
Replacing an old motion sensor light is a lot easier than wiring a new one where a light does not already exist. In most cases, the motion sensor should be wired by a professional electrician. If you have qualified experience and you understand how electricals work, you can try to install a new motion sensor light on your own.
Here are the steps that will help guide you with the process:
- Find the main fuse box and turn off the power.
- Use a voltage and circuit tester to test each wire to ensure the power is off.
- Put on the motion sensor’s mounting strap where you can attach each wire before mounting your fixture.
- Match the supply wire on the fixture wire by colors. Pair the black supply wire with the black fixture wire, and the white supply wire with the white fixture wire. Also, pair the ground supply wire with the ground fixture wire.
- Connect each wire using connectors and electrical tape. Secure with a nut cap.
- You can use a voltage meter to identify positive, negative, and ground wires if wiring colors do not match. Secure all connections properly..
- Attach your fixture to the mounting strip securely.
- Turn on the power in the main fuse.
- Test your light and adjust the motion sensor sensitivity according to your preference.
Installing a Smart Motion Sensor Security Light
Smart motion sensors can be paired directly with smart lights to help deter intruders, avoid accidents in the dark, and reduce energy expenses. These are a great addition to a smart lighting system. It allows you to configure motion sensitivity and what they do based on the time of day. The installation process for smart motion sensors may vary depending on the type and brand, so it’s important to read and follow the specific instructions carefully.
Here’s a simple guide on how to install smart motion sensor security light:
- Mount the smart motion sensors using the screws or double-sided tapes that come with the product.
- To install using the screws, flip the sensor upside-down and slide to remove the base. Align with the wall and mark off the screw positions with a pencil. Insert the mounting anchors on the wall, then use the mounting screws to attach the bracket to the wall.
- To install using the double-sided tape, flip the sensor upside-down and slide to remove the mounting base. Attach the double-sided tape to the bottom of the mounting base. Clean the area where you want to install the sensor, peel off the tape and place the mounting base on a flat surface.
- Open the sensor battery compartment by turning the lid counterclockwise until there’s a click. Insert the included battery or remove the tag if the battery is already inside.
- Press the reset button to turn on the sensor.
- Connect to the electric cap, attach the sensor to the mounting base, and lock in place.
- When the LED indicator is rapidly blinking blue, it means the sensor is ready to connect. If the indicator is not blinking, press and hold the release button for at least 10 seconds.
- Download the indicated app. Connect to your smart device and add a device by clicking the plus sign in your mobile app.
- Select device type (sensors, motion sensor).
- Enter the credentials of your WiFi network.
- Press and hold reset until the light blinks rapidly, and the sensor will then connect to your app.
- Wait for the confirmation. Once confirmed, your smart motion sensor is ready to use.
Important Reminders
The installation process of motion sensor security lights may require a certain knowledge of electrical procedures. Make sure to proceed with caution. Read the specific instructions that come with your product thoroughly, and don’t hesitate to hire an experienced electrician to do the installation for you if you are unsure.
Do You Need an Electrician to Install a Motion Sensor Light?
If you are comfortable working with electricity, then an electrician is not needed to install a motion sensor light. However, if you lack confidence or knowledge in how to complete the installation, then it would be a good idea to hire an electrician.
Does a Motion Sensor Light Need a Switch?
You could wire a motion sensor light directly to a circuit breaker without a switch. However, having a switch is optimal and it would be best to check the local code requirements in your town.
Related Articles