Last Updated on August 25, 2022 by The Tutor
How to Wire a Light Switch
Learning how to wire a light switch is one of the basic skills that every homeowner should do. As a homeowner, you will likely need to replace a light switch many times and paying an electrician is not optimal when you can do it in just a few minutes.
Our instructions on how to wire a light switch for a standard light switch, a three-way light switch and a four-way light switch are outlined below. It is important to also read the directions that come with your particular light switch because there may be something different about the one you purchased or a change in technology that would require a different light switch installation.
Before you do anything, you will need to cut the power to the light switch. If you do not know which breaker feeds your switch, then just turn on the light and test each breaker until you find the one that turns off your lights.
Tools Needed to Wire a Light Switch 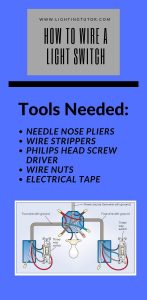
- Needle nose pliers
- Wire strippers
- Philips head screw driver
- Wire Nuts
- Electrical Tape
Basic Knowledge of How to Wire a Light Switch
- Black Wire – This is the hot or load wire
- White Wire – This is the neutral wire
- Bare Copper (Green) Wire – This is your ground wire
- Red Wire – This wire is used for 3 or 4 way switches and will connect the switches together so they can each control your lights.
Important – If you are replacing an existing switch, make sure that you take not of how it is wired before you remove the existing wires. See where the black and white wires are connected. If there are more wires for a three-way switch, then also keep track of where those were also connected. You will want to replicate that same wiring scheme when you install the new switch.
Stripping the Wires
First, know what gauge wire you are working with. It will either be 12 or 14 gauge wire. Then, use your wire strippers and strip away about 5/8 of an inch of the insulation from the wire. The wire strippers should have a spot marked for each gauge wire.
Next, bend the wire into a pig tail loop so that you can easily attach to the screws on the light switch. Your switch may have slots to push the wires straight into place rather than use the screws on the side.
How to Wire a Standard Single Pole Light Switch
A standard single pole light switch will simply require you to attach the black (load) wire into it, and then the black wire leaving the switch and to your lights. The switch serves to cut the power from reaching the light switch.
The white or neutral wire bypasses the switch and goes straight to your lights. This wire is needed to complete the circuit.
The ground wire (sometimes in a green jacket) should be connected to your switch and to your lights.
When you are finished, it is a good idea to wrap the switch with electrical tape to cover the connections. This prevents the chances of an arc in the event that something comes loose in the electrical box.
This simple diagram should provide you with the basic understanding as to how a single pole light switch is wired.

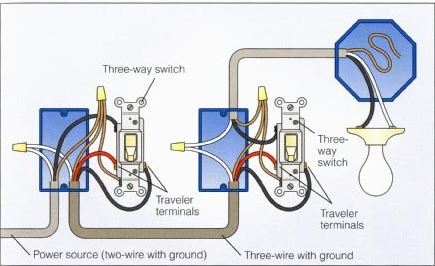
How to Wire a Three Way Light Switch
A three-way light switch is one where you have two switches that have the ability to control the same light or set of lights. Therefore, the 2 switches + the light = 3 way. There will be an additional wire needed (often red) to connect the switches together to a dedicated screw or input on the switch that is specifically marked for this purpose.
Three-way switches will have traveler screws or connection points. These will be wired from one switch to the other so that the lights will turn on or off regardless as to which switch you use.
The white wires in this situation are just connected together and never touch the switches. The black wire is going to be connected to the black screw on the switch
The main wire that will go from one switch to the other should have 4 wires total (black, white, ground and red).
Review the diagram below for basic three-way wiring instructions.
Here is our video on how to wire a 3-way light switch
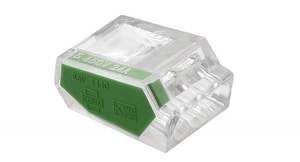
Wire Nuts
You have various options for the wire nuts now. The traditional screw type but now also the push in wire nuts which are so much easier. No twisting at all and these take up less room inside of your electrical box.
Conclusion – How to Wire a Light Switch
As you can see, wiring a light switch does not have to be complicated. Like any other home improvement project, it simply requires a little research and patience. If you have any questions, simply ask down below in the comments. If you are using a dimmer switch, then see our article on how to choose a dimmer switch before you make your purchase.
Related Questions
Do I need an electrician to install a light switch?
Installing a light switch is something that any homeowner can do if you are comfortable working with electricity. If you are not sure of yourself, then absolutely hire an electrician.
Does it matter which wire goes where on a light switch?
It is important to wire the light switch properly and according to its instructions. It is possible to cause serious damage to your switch or fixture and even start a fire if you do not wire the switch correctly.
Does the hot wire get connected to the light switch?
The hot wire does get connected to the light switch while the white neutral wire does not. There are some light switch installations that also have the neutral wire going to the switch.
It is hard to install a 4 way light switch?
Installing a 4 way light switch is more complicated and is much easier done during new construction.
Related Articles
How to Choose the Right Light Bulbs
How Many Outlets on a 20 Amp Circuit?