Last Updated on April 2, 2020 by The Tutor
How to Install Under Cabinet Lighting
Under cabinet lighting will help bring your kitchen to life and will help transform it into a showplace.
Learning how to install under cabinet lighting is something any homeowner can do. With the proper planning this is DIY project with an average difficulty level that should only take a few hours to complete.
I will take you through the installation of hard wired under cabinet light fixture and also will provide my installation video below. You can review my recommended under cabinet lighting options here.
How to Install Under Cabinet Lighting in 10 Steps
- Determine what type of under cabinet lighting makes sense for you.
- Layout the project
- Identify the power source
- Develop a wiring plan
- Placement of the under cabinet light fixtures
- Install wiring and switch
- Install the under cabinet light fixtures
- Hide the under cabinet lighting wires
- Adjust the fixture settings
- Enjoy your kitchen
1. Determine the type of under cabinet lighting
The first decision you will need to make is what type of under cabinet lighting to buy and then which fixture. Each type will have a different installation method which is why deciding which one is the first decision you will have to make.
I have often mentioned that my preference is to use a hard wired LED under cabinet lighting fixture. It will be the best for your kitchen from a results and efficiency perspective. You can read about my recommended under cabinet lighting options here.
Your under cabinet lighting options will be as follows:
- Hard wired LED
- Under cabinet light bars
- Wireless pucks
- LED tape lights or strip lights
- Wireless light bars
This step in deciding which lighting option to go with and then which fixture to buy should not be rushed. For some perspective, it took me two months of research to figure out what to do. That process included watching videos, reading websites like this one, and even ordering some of the lighting options and testing them before making a final decision. I have done all of that work for you.
2. Layout the Project
This step is where you decide where you are going to add under cabinet lighting. Will you put them under every cabinet or are you looking to light just one area? Some people have kitchens that have cabinets on two different walls and even a small desk to pay bills and use a computer.
My preference is to put a light under every cabinet. If your budget allows, it is also important to put fixtures that span the entire length of the cabinet so there are no dark spots or shadows. This is another reason why I prefer fixtures instead of some of the other options such a puck lights.
Is this a full remodel or are you adding under cabinet lighting to a finished kitchen?
I ask because your answer to this question will then change how you will install your under cabinet lights and your options will change.
Remodel – If you are remodeling your kitchen, then I recommend that you completely cut out the existing backsplash and dry wall like you see in the photo below. This is by far the easiest way to manage the under cabinet light installation and it also helps to install your new tile back splash. In this photo, it was removed during a full remodel but you can also do this if your cabinets and counter are not being removed.
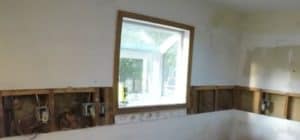
Cutting out the dry wall allows you to run your wires quickly and easily without any obstructions. Re-installation of the dry wall is very easy and it provides you with a nice clean, smooth and even surface to install your new back splash tile. In fact, even if you have an existing kitchen that you were not remodeling, I would consider changing the back splash and the under cabinet lighting at the same time. You can probably pick out some new tile that will look great with the new lighting.
If you are not remodeling your kitchen and just want to add the under cabinet lighting, then you will have to get creative with how you snake the wiring. I will take you through that process below.
3. Identify the Power Source
One of the things that should be a bit easier when it comes to installing under cabinet lighting is identifying a power source that you can tap into. These LED lights use very little power so there is no need to run a dedicated line from the panel to your kitchen simply to provide power to your under cabinet lights.
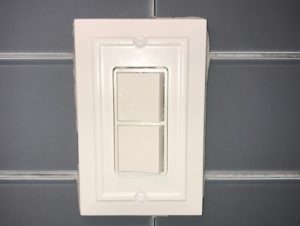
One of best options is to use the light switch that most kitchens have to turn the light on over the sink. This assumes that you have one of those of course. You have a power source going to that switch to handle that light over your sink which hopefully you are also changing to a beautiful pendant light.
As you can see in the photo below, I turned a single switch into a double switch. One powers the pendant light and the other is controlling the under cabinet light. In my opinion, this is the easiest and best way to source power for your lights.
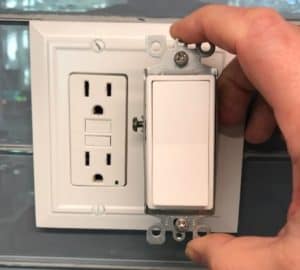
If you do not have a switch for a light over your sink, or any other light switch, then you can tap into an outlet that is in your backsplash. In this situation, I would recommend that you remove the single outlet box and replace it with a double. One side will have a traditional outlet for you to plug in some counter top appliances and the other side will be your switch. This may be what you want to do if you plan to use a dimmer switch since those tend to be larger.
Some low voltage under cabinet lighting fixtures have a transformer. In these applications you bring your main power to the transformer and then from the transformer you run low voltage wires to the fixtures. You can hide your transformer either inside one of your upper cabinets or inside one of your lower cabinets. The kitchen sink cabinet works well for this. See below on how you would wire for low voltage lighting with a transformer.
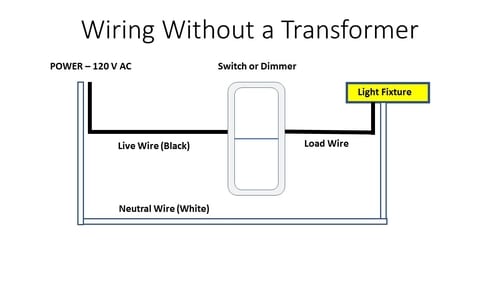
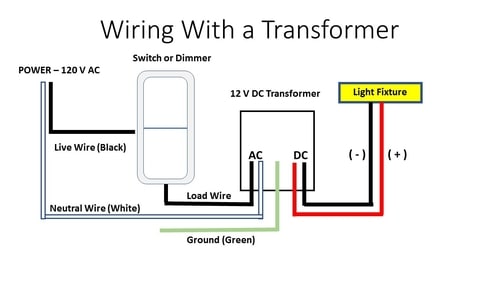
** These diagrams are a general guide. Please follow the instructions that come with your fixtures
4. Develop a Wiring plan
Developing a wiring plan or diagram is critical before you begin the project. So far, everything we discussed so far is about planning. Most successful projects are the result of great planning. That is especially true when it comes to under cabinet lighting.
Now that you have identified where your under cabinet lights will be placed and you know where your power source is, you must determine the best route to fish the wires. If you have removed the backsplash and the wall is exposed, then you can do whatever you want. If you are trying to run wires through an existing kitchen without a remodel, then you are likely going to be running wires vertically to avoid going through studs
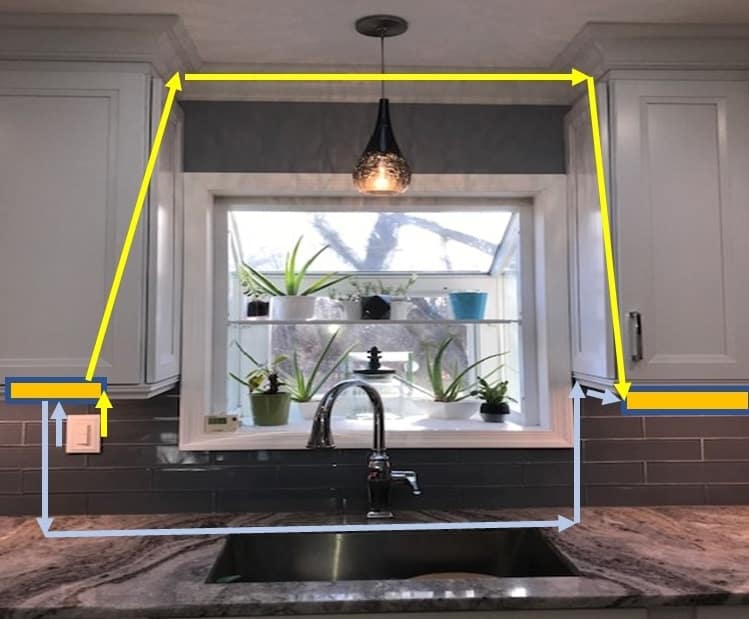
I am attaching a picture below of my kitchen. You can see that I also had to cross over the sink. In this situation, you have three options…
- Run the wire through the lower cabinet behind the sink and then up through the wall and into the upper cabinet. (See below – Blue)
- Use a different power source on the other side of the sink. This means you will have to flip two switches which is not optimal.
- Run the wire behind the crown molding at the top which is what I did. If you have a decorative valence that connects the two upper cabinets, you can have your wire hidden behind that as well. (See below – Yellow)
5. Placement of Under Cabinet Lighting Fixtures
Selecting the placement location for your fixtures will make a difference on how the light will appear in your kitchen and on your counters. One of the deciding factors is whether you want your under cabinet lighting to be task lighting. To help you to make your decision, read this article on under cabinet lighting placement location.
If you are uncertain about the placement location, then you may want to consider an under cabinet lighting fixture that swivels. I discuss one of them in my list of recommended under cabinet lighting fixtures. It will allow you to point the light downward our out towards the edge of your counter.
6. Install Wiring and Switch
Now that you have your plan and you know where you are placing the fixtures, you are ready to install your under cabinet wiring and switch. You may refer to the wiring diagrams above as a guide but please follow the wiring instructions that come with your under cabinet light fixtures.
- First, turn off the power source!
- You should then layout or run the wiring leaving up to a foot of extra wire at each connection point depending upon how much space you have to work with. This will make installation easier, so you are not working so close to the wall or cabinet. You can then push any excess wire into the wall. Speaking of “easier”, you should consider using the smallest gauge wire possible based upon the specs of the fixture that you are purchasing. The smaller the wire, the easier it will be to fish through the walls, bend and splice.
- Next, wire your switch and seat screw it into the receptacle. After this, I want you to connect your first lighting fixture. It can be just laying on your counter and does not have to be screwed into your cabinet yet. Then, safely turn the power to the switch and check to see whether you can get that first fixture to work. This will identify any wiring issues with your switch now, before you take the time to install the rest of the fixtures under the other cabinets.
- Finally, connect the wires to the other fixtures. The under cabinet lights that I recommended can be hard wired from one to the next. They also come with an easy plug and play option if you prefer that method. In my application, it was easier to attach the wiring for each fixture BEFORE attaching the fixtures to the cabinets.
7. Attach the Under Cabinet Lighting Fixtures
This is when you attach the under cabinet lighting to the underside of the cabinets. It is also a part in the process where there may be some disagreement. Some may want to screw the fixture into the cabinet before attaching the wiring. In the end, this is up to you.
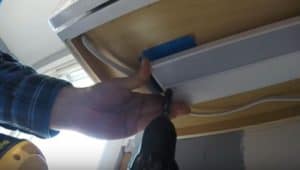
Measure your distances and you can use pieces of masking tape on the underside of the cabinet to mark where each fixture should go. When you are turned upside down trying to screw the fixture in, it is easy to have it slide on you. So, the tape is a very visible way to mark your spot as seen in the photo below. When you are done, just remove the tape. It is a bit better than marking up the bottom of your cabinet with something permanent.
If your fixtures came with the mounting hardware and screws, they should go into the bottom of the cabinets fairly easily. Warning – check the length of the screw they supplied and make sure that it is not too long. You do not want it to come up through the bottom of your cabinets. Do not over tighten, otherwise you can strip the hole. This is especially true if your cabinet is not made of solid plywood construction.
8. Hide the Under Cabinet Lighting Wires
You just spent a lot of time and money trying to install under cabinet lighting. The idea is to make your kitchen beautiful and your project is almost finished. You do not want to see any wires hanging at all so take the extra step to make it look professional. In the photo below, you can see that a hole was drilled between the two cabinets so the wire can remain up high.

There are a myriad of options and methods to do this. You can use clips, staples, etc. Take a look at this article on how to hide under cabinet lighting wires. It should give you a few ideas on how to conceal the wires safely.
If you are able to still see the wires and more importantly the fixture, then consider installing a light rail along the bottom edge of your cabinets. This will add an additional inch of depth to the cabinets and will help to hide both the wires and the fixture.
9. Adjust the Under Cabinet Fixture Settings
In the discussion about Kelvin Color Temperatures, we talked about which temperature is optimal for various kitchen applications. The recommended under cabinet lighting fixtures have have multiple color options and also have a built in dimmer with two brightness settings.
In the evening, test all of the different light temperature settings and see which one looks the best for your kitchen. Test this with the main kitchen lights on and off. We often only have the under cabinet lights on in the evenings because we enjoy the less intense and more inviting light that we get from the under cabinet lighting.
10. Enjoy Your Beautiful Kitchen
Thank you for reading through the tutorial on how to install under cabinet lighting. Once you complete this project you will enjoy your kitchen much more. This one project made me a believer in how lighting can make a huge difference. If you have any questions or comments, please leave them below. If you are considering buying lighting products, we would appreciate it if you would follow our links to make your purchase.
See Our Recommended Under Cabinet Lighting Products
Related Questions
What is the best under cabinet lighting?
The best under cabinet lighting is what works best for your kitchen and your application. For me, the best option is one that is an LED fixture with multiple temperature settings and either has a dimmer or can be used with a dimmer. If you are selecting under cabinet lighting that has just one temperature, then I would go with 3000k.
How much does it cost to install under cabinet lighting?
If you are installing the under cabinet lighting yourself, then the cost will be an average of $60 per fixture including the wiring and the switch. That is the average cost because smaller fixtures for smaller cabinets will cost less, and of course the larger fixtures will cost more. You can go for less expensive tape or strip lights, but they will not look as good as a hard wired fixture. If you are having someone install the under cabinet lighting for you, then you should add $100 per fixture.
How do you power under cabinet lighting?
One of the first steps in how to install under cabinet lighting is finding the power source. You can simply tap into an existing light switch in your kitchen and just turn it into a double switch. The power that already goes to that switch should be sufficient to also power your under cabinet lights. I like to use any light switch that is currently located in your kitchen backplash.
How do you measure for under cabinet lighting?
Measuring for under cabinet lighting is another critical step that needs to be followed closely during the planning process and before you purchase the lighting fixtures. Follow the instructions in this article about how to measure for under cabinet lighting.