Last Updated on August 21, 2022 by The Tutor
How to Install a Chandelier

Installing a chandelier is a great way to enhance the appearance and lighting of your dining room, living room or even an entrance. In addition to improving illumination, chandeliers can also add a unique architectural style and aesthetic touch to your home.
Many homeowners believe that chandeliers come with complicated electrical setup, and the thought of installing one themselves could be a bit intimidating.
Installing a chandelier can be done by an electrician, or if you are able to use basic tools and feel comfortable working with electricity, it can be an easy do it yourself home project.
Whatever type of chandelier you use, it is hung in the same manner as any kind of light fixture. If your home has an existing old chandelier, the task will be as simple as removing the old chandelier and attaching a new one to the existing wiring system.
How to Remove an Old Chandelier Safely 
Before removing the chandelier, make sure to do all the necessary safety measures. You may also need someone to assist you especially if you are removing a big chandelier. Here are the simple steps on how to safely remove an old chandelier:
- Turn off the power to the chandelier in your breaker panel.
- Prepare the area under the chandelier and make sure it’s clear of any objects. Use a step ladder under the chandelier so you comfortably reach the chandelier.
- Find the chandelier escutcheon, which is the base of the chandelier that is connected to the ceiling. Remove the screw that secures the escutcheon to the ceiling.
- Keep holding the chandelier as you lower the escutcheon, then remove the mounting screws that secure the chandelier to the junction box. Ask an assistant to hold the chandelier to ensure that it won’t fall.
- Make sure that the wires are not live by touching a circuit tester to the wires running down the chandelier’s chain. See the manufacturer’s manual on how to use the circuit tester.
- Unscrew the wire nuts connecting the wires, then separate the wires if they are still twisted. Disconnect the grounding wire if it is physically screwed to the junction box. Ask an assistant to hold the chandelier as you disconnect wires.
- Lower the chandelier and set it aside. Tuck the ceiling wires back into the junction box. This is ready for the new lighting fixture to be installed.
Height Recommendation for Chandeliers
The height of the chandelier can affect how it functions as a lighting fixture and as a decorative feature of the room. The standard recommendation for hanging chandeliers is that the bottom of the fixture should hang between 30 and 36 inches over a table with an eight-foot ceiling.
If you have high ceilings, mount the chandelier 3 inches higher for each additional foot of ceiling height over 8 feet.
You may also adjust the height of the chandelier based on your room size, table size, and your preferred amount of light illuminating the room. Aside from making sure that it looks good in your room, an important function of a chandelier is to light up the room. The way in which light is projected depends on the fixture design, the light bulbs, and the height of the chandelier.
There is no hard-and-fast rule when it comes to finding the perfect chandelier height. The important thing is that you should like how it looks in the room and that the lighting should work well.
How to Install a Chain Hung Chandelier
A chain hung chandelier light can be both stylish and functional. The long chain where the light is suspended from can easily be shortened by removing the excess chain links depending on your preference and needs. Here is the process on how to install a chain hung chandelier:
- Assemble the fixture according to the manufacturer’s instructions.

- Determine your desired height for the chandelier. Lay-out the lamp and chain in a straight line, measure the total length, and remove the excess chain links using pliers.
- Weave the lamp’s wires through the links. Make sure the wires are approximately 8 inches longer than the chain. Cut the excess length off the wires when necessary. Strip the ends of the wires to expose half an inch of bare copper.
- Install the crossbar or mounting bracket to the electrical box. Screw the top of the collar loop into the center of the crossbar.
- Thread the wires through the collar loop and canopy. Attach the top link of the chain on to the collar loop and close the open link with pliers.
- Push the wires of the chandelier through the center of the collar loop until they emerge towards the electrical box. Connect the bare ends of the wires together by matching the colors. Secure the twisted connections by twisting them together with wire nuts.
- Tuck the wires into the back of the electrical box, then thread the canopy over the collar loop. Secure it tight with the collar ring. Install the light bulbs when needed
- Turn on the circuit breaker to bring power to the fixture.
How to Install a Rod Hung Chandelier
A rod chandelier is an ideal lighting fixture for rooms with high ceilings because the rod allows the light to hang properly. To install a rod hung chandelier, you need to place the mounting strap over the electrical box in the ceiling and make sure it is secured with screws.
You can then refer to the following procedure: 
- Assemble the chandelier on the floor using an appropriate rod for your desired installation height.
- Pass the wire through the rod and the chandelier’s canopy, then screw it onto the threaded connector. Ensure wires are not twisted and that they protrude from the hole at the top of the canopy.
- Cut wires so they have the same length, then connect the wires in the electrical box to the wires on the chandelier by matching the colors of the wires. Twist the ends of the connected wires and cover with wire nuts.
- Tuck the wires carefully into the electrical box in the ceiling. Secure the canopy to mounting brackets using cap nuts and star washers. Install new bulbs on the chandelier if necessary.
- Turn on the circuit breaker to restore power to the fixture.
How to Install a Cord Hung Chandelier
While most chandeliers are hard-wired into a securely mounted junction box in the ceiling, there are chandeliers that have a less permanent connection, such as a swagged cord chandelier.
With the use of a swag kit, you can plug the chandelier into a standard outlet. Here is the basic process on how to install a cord hung chandelier using a swag kit:
- Locate the nearest ceiling joist on which you would like to hang the chandelier and mark a drill hole location on the drywall using a pencil.
- Using a power drill with a 1/8-inch drill bit, drill a pilot hole through the drywall and into the ceiling joist. Screw one of the hooks from the swag kit into the pilot hole.
- Find the outlet to which you will connect the electrical cord for the chandelier. Drill a pilot hole into the ceiling for a second swag hook above the outlet.
- Weave the exposed-wire end of the swag kit’s electrical wire through every other link of the swag kit’s chain. Connect the last link of the swag kit’s chain to the last link of the chandelier’s chain using a pair of pliers.
- Strip the ends of the wires to expose 1/2-inch from the two insulated wires. Connect the exposed ends of the stripped wires from the swag kit to the wires from the chandelier, and secure the connection with electrical tape.
- Place a heat shrink tubing over the connections and shrink the tubing using a hairdryer or a lighter to secure the connection.
- Go back to the hook from which the chandelier will hang. Place the chandelier to your desired height, then connect the nearest link into the ceiling hook. Go back to the hook over the wall outlet and loop the chain onto that hook so that it traverses the ceiling.
- Finish off by inserting the swag kit’s electrical plug into the outlet.
Tools Needed to Install a Chandelier
The tools that you need for installing a chandelier may vary depending on the type of chandelier you are using. You may also need other equipment not mentioned below, and it’s important to have someone to assist you while removing and installing a chandelier to make the task a lot easier.
In general, the following tools are necessary for a standard chandelier installation:
- Stepladder
- Screwdrivers
- Wire strippers
- Needle-nosed pliers
- Non-contact voltage tester
- Wire nuts
- Tape Measure
- Power drill
- Electrical tape or heat shrink tubing
Typically, new chandeliers come with their own instruction manuals. It’s best to carefully follow the specific instructions on how a particular chandelier should be installed.
It is also important to note that installing a chandelier requires general knowledge of the electrical systems. There is a risk of electric shock associated with this task, so it’s best to contact a qualified professional if you are not sure or feel uncomfortable.
Installing a Chandelier on a High Ceiling
The procedure to hang a chandelier on a high ceiling is the same as a traditional 8 foot ceiling with the exception of the added height which creates an element of danger and difficulty.
If the ceiling is two stories high such as the vaulted ceiling in an entrance, we recommend renting a scaffold to manage this project. One person on a very tall ladder trying to lift a heavy chandelier, support it and manage the wiring is a recipe for disaster.
One of the key elements you need to consider is the height of the chandelier. Although you may have a very high ceiling, the chandelier should be dropped to a height that will allow it to be seen and to deliver the appropriate amount of light.
Careful planning is needed not only to determine the height but also to develop an installation plan. This would be one of those instances where it may make sense to hire a professional.
Cost to Install a Chandelier
If you decide to hire a professional to install your chandelier, you can expect the cost to be approximately $110 – $250 depending upon whether it is a simple replacement or a new installation where there was no existing light fixture.
When an electrician is simply replacing an existing light fixture, it is a job that should take them just one hour of labor. However, here are some reasons why the cost to install a chandelier could be higher:
- Supplying a new power line to the fixture
- Adding a light switch
- Installing on a very high ceiling
- Pigtail aluminum to copper wiring
The costs to have a chandelier installed will also vary based upon where the home is. Unfortunately, there are some high cost areas of the country where prices could be twice as high as other locations.
How to Install a Heavy Chandelier
There are some extremely large and heavy chandeliers which likely cannot be supported by a traditional electrical box in the ceiling. The weight of a heavy chandelier could potentially rip the fixture from the ceiling causing damage to the dry wall, the chandelier and potentially to objects below.
We recommend installing one of these Arlington mounting brackets in the ceiling to support the electrical box and weight of the chandelier. These brackets can be installed easily through the existing electrical box hole.
The bracket rod spins and expands outward until it meets and fastens itself to the ceiling joists. Hand 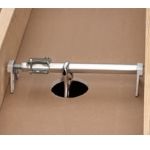 tighten and then use pliers to continue tightening until the bracket is completely secure.
This easy to install chandelier mounting bracket can be purchased here (click for price)
Installing a Chandelier Where a Ceiling Fan Was
If you currently have a ceiling fan but would like to replace it with a chandelier, then this should be an easy project to complete. The wiring will likely be the same and you should also have the ability to use the same electrical box in the ceiling.
Simply remove the ceiling can after turning off the power from the breaker. Then follow the installation instructions for your chandelier.
If the chandelier is much heavier than the ceiling fan was, then check to make sure the electrical box is secured to a rafter and that it can support the weight of your chandelier.
Installing a Chandelier without an Electrical Box
You may have a situation where you need to install a chandelier and there is no electrical box in the ceiling. This could happen when the original light fixture was not wired to code and did not have an electrical box. It also could be that you are trying to install a simple plug in chandelier without bringing new power to the fixture behind the wall.
When you are installing a chandelier without an electrical box, you will need to find a rafter or ceiling joist to support the weight of the light fixture. Screw an old work pancake box to rafter, then install your chandelier to the pancake box.
Wiring Instructions for a Chandelier
When wiring for a chandelier, you would follow the same process as any other light fixture. You will have your load (black), neutral (white) and ground wires to connect.
There are fixtures which have wires that do not follow the same black and white color scheme. Please take time to read the wiring instructions for your fixture and remember to cut the power before beginning your installation.
You will likely have a light switch tied into your chandelier. In that instance, you will connect the load (black) wires to your chandelier and bypass the neutral wire capping them off together inside of the electrical box.
How to install a plug in Chandelier
When installing a plug in chandelier, the power source is coming from an outlet in the room and not from an electrical box from above. This means the most critical thing is to fasten the chandelier to a rafter or ceiling joist.
Once you have the chandelier secured to the ceiling, you can run your wire or chain with the wire woven through it across the ceiling and then down the side of the wall to the outlet.
Some outlets are powered by a light switch which would make this option much more convenient.
Related Questions – How to Install a Chandelier
Can you install a chandelier without a ground wire?
Installing a chandelier without a ground wire is not safe and is likely not an approved method by the local building code. However, the light fixture will still work if installed without a ground wire.
Do you need an electrician to install a chandelier?
Installing a chandelier is something that most homeowners can do themselves. However, if you are not comfortable working with electricity, then it is recommended to hire an electrician.
How can you test a chandelier before installing?
You can test a chandelier by using an ohm meter which will help determine whether you have a full circuit. You can also use a simple lamp wire connected to the load, neutral and ground wires on the chandelier with the other end plugged into the wall
Can a chandelier be used with a 3-way switch?
A chandelier can be used with a 3-way light switch and the wiring would be the same as any other 3-way lighting application. Read our article on how to wire a light switch for detailed instructions.
Can I install a chandelier with aluminum wiring?
You can install a chandelier with copper connections to power supplied by aluminum wiring. However, you should take measures to pigtail the connections or use alumiconn connectors to make the copper to aluminum connections safe. If you own a home built from 1967-1972, there is a good chance that you may have aluminum wiring.
Related Articles
Which Chandelier Light Bulbs are the Best?
The Best Lighting for an Entrance