Last Updated on April 2, 2020 by The Tutor
 How to Install Recessed Lighting in 5 Steps
Recessed lighting can be found in almost every home today. If installed properly, it can add the perfect amount of light and ambiance needed for each room in your home. Selecting the perfect recessed lighting fixtures are also a key element.
Installing recessed lighting is a DIY project that most homeowners can do. The planning process is extremely important, and the tools needed for the installation are very basic. Most of the installation is a construction project versus electrical.
I will take you how to install recessed lighting which sometimes can be referred to as cans, pot lights or high hat lights. For existing homes where you are remodeling, you will need to select remodel or old work cans. They are sold in a few different sizes so if you plan to use small lights, then make that decision now.
You should also consider getting cans or housings that are IC rated which simply means they are safe to place up against insulation. Non IC rated cans can get extremely hot when using incandescent or fluorescent bulbs, but LED lights yield very little heat.
I would make sure your fixtures are air tight. This will help reduce the loss of heat and energy. See my recommended recessed lighting fixtures if you need help deciding.
Tools Needed to Install Recessed Lighting
- Tape Measure
- Dry Wall Saw
- Wire Strippers
- Stud Finder
- Wire Caps
- Dimmer Switch
- Flex Drill Bit – depending upon your installation
- Wire – length and gauge depending upon your project and code.
- Recessed Lighting Fixtures – click to see my recommended fixtures
When it comes to the tools needed to install recessed lighting, you can see my recommended lighting tools and accessories here. These have been tested by myself personally.
How to Install Recessed Lighting in 5 Steps
- Determine How to Layout Recessed Lighting
- Develop a Wiring Plan
- Cut the Recessed Lighting Holes
- Run Your Recessed Lighting Wires
- Install the Recessed Lighting Fixtures
Determine How to Layout Recessed Lighting
Planning the layout for your recessed lighting project is likely the most important part of the process. I am a huge fan of planning and measuring multiple times. I usually spend as much time planning as I do with the installation. It works well for me and something I recommend for you too.
Before you proceed, you will need to read my article on how to layout recessed lighting. It will show you exactly how to figure out how many recessed lighting fixtures you will need and where to place them.
Once you have finished figuring out your recessed lighting layout, mark the spot on the ceiling with a small piece of tape. These initial placement markets are just temporary. We need to make sure the spots we just marked are not obstructed by a ceiling joist.
Use a stud finder to locate the ceiling joists. From there, figure out whether your initial fixture placements will need to be moved slightly to compensate for the stud locations. Remember, you need room for the entire diameter of the fixture plus at least one more inch of space between the fixture and the stud. If you have to move one over a few inches, then move the others slightly as well so they are all spaced evenly from one another.
Now, you can make more permanent marks on your ceiling. Each mark should be the center point for each of your recessed lighting fixtures.
Develop a Recessed Lighting Wiring Plan
This is the next most important part of your planning which you hopefully thought about prior to marking the ceiling for the placement location. Here are some key things to think about.
Locate the power source – Hopefully you have an existing light in your ceiling whether it is a fixture or even track lighting. If so, you will simply patch into that spot where the current fixture is located. Then you will run your wires from there and then cap that receptacle for safety. This scenario is the most common.
Can you access the ceiling from your attic? If so, this will make it much easier to run your wires and your installation will go much quicker.
If you cannot access the ceiling from your attic, then you will need to fish wires from one recessed lighting can to the next. This will likely be the most difficult part of the installation. You already know where your studs are so plan to run your wires parallel to the ceiling joists for the least amount of obstruction.
At some point, you will need to cross over a few ceiling joists. Select the path of least resistance and plan that route for your wiring.
Cut the Recessed Lighting Holes
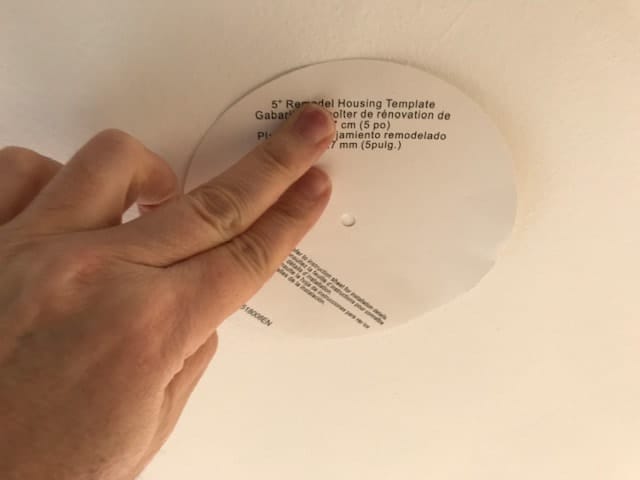
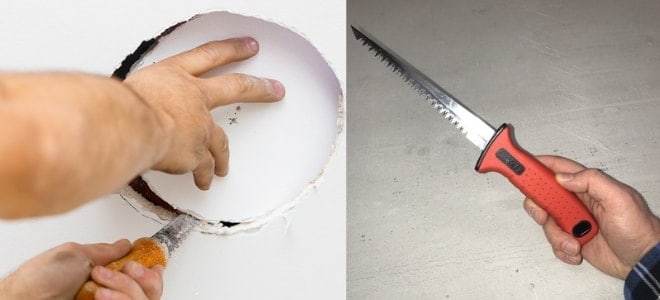
You have your spots marked and now you are ready to make your cuts. Your recessed lighting can likely came with a paper template to cut the hole. Tack the center of it to the center of your mark. Trace the outer edges of the template with a pencil or a marker.
Drill a hole through your center mark large enough to get the point of your dry wall hole saw through. Then, take your dry wall saw and poke it through by hitting the back of the saw with the palm of your hand. You will now saw to the edge of the circle you drew and then carefully cut out your circle.
Tip – This hole saw will create a lot of dry wall dust. Have someone positioned below you with an opened pizza box or something similar to catch all of the material that will be dropping from the ceiling.
Run Your Recessed Lighting Wires
Cut the power to the light that is currently in your ceiling and then remove it. Take care of the wires that are coming into the light fixture from your ceiling because these will be connected to the new wire that will go to your recessed lights.
Before connecting a wire to a fixture or to the power source, you want to run your wires and leave them hanging about 1 foot down from the holes. This will give you enough room to work with the fixtures and attach the wires.
Pull the wires easily through the spaces in your ceiling parallel to the ceiling joists. To cross over through the ceiling joists, use a long flex drill bit to drill a hole all the way through the joists towards the can on the other side. Make sure the drill bit is absolutely level when drilling into the first joist. That way, it will continue to be level as you go forward to the next one.

Once you are through to the other side, remove the drill from the bit but leave the bit in the ceiling. Tape a wire to the back and of the bit and then pull the bit out from the other side while also pulling the wire through at the same time. *important – have someone pushing the wire for you on the other side so you do not pull the wire off of the bit.
If you do not want to use a flex bit to drill holes, then you can cut slots in your dry wall where the ceiling joists are. Then, use a regular drill bit to drill the hole. You can easily push the wires across the ceiling that way without having to buy a flex bit for this one job. If you are comfortable patching dry wall, this may be the best option for you.
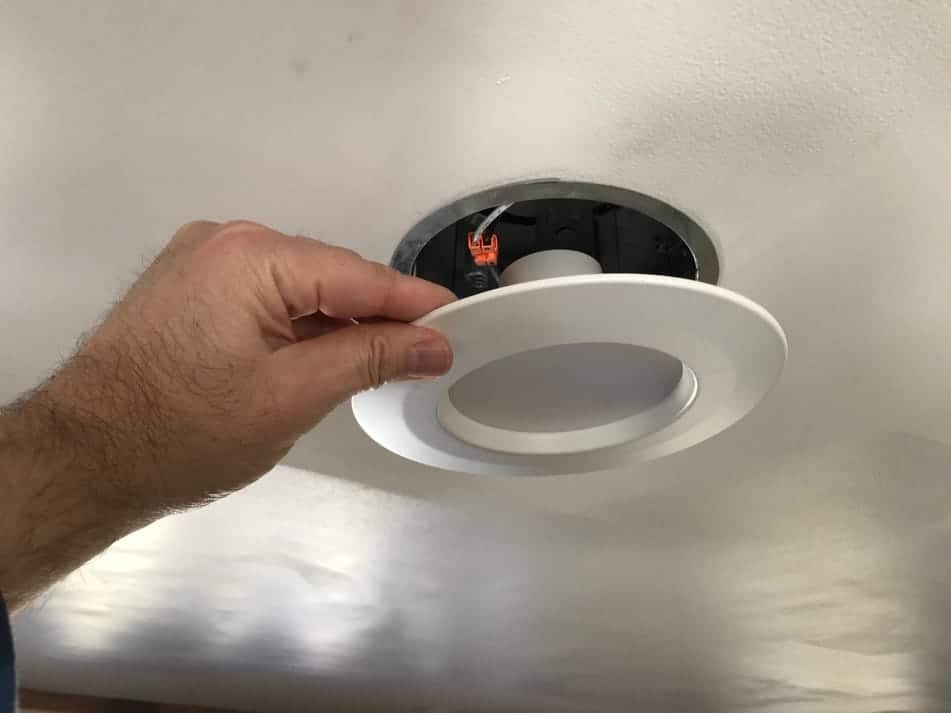
Install the Recessed Lighting Fixtures
Now that you have your wires snaked through the holes and hanging down from the ceiling, strip the ends according to the installation instructions on your recessed lighting fixtures. Most of the new ones come with push in wire installations that are extremely easy to use. The instructions will tell you how much of the wire to strip.
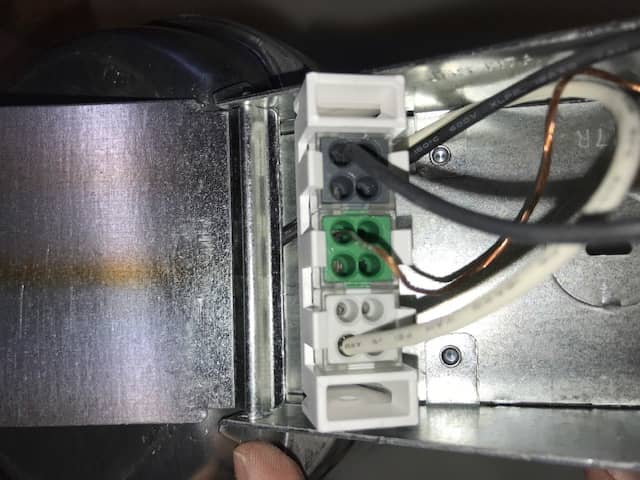
It may be a little difficult to hold the fixture while trying to attach the wires at the same time. So, prepare the fixture by opening the compartment and exposing its wires so all you need to do is push the first wire in tight and it will hold the weight of the fixture. Then, push in the other wires and move onto the next fixture. Do not push the fixture into the ceiling until all of your wire connections are finished.

Once the lighting fixtures have been connected, then splice the new wire to the power source in the ceiling with wire nuts. Then, if you are comfortable that the connections are done right, turn the power back on and then flip the light switch.
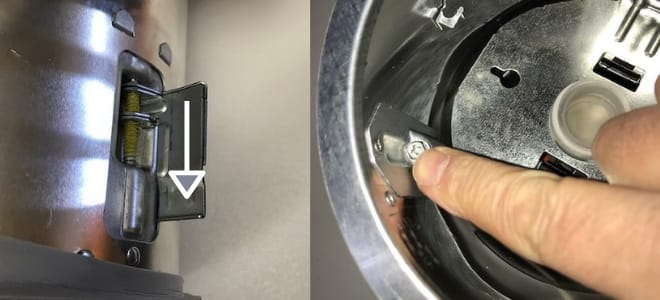
If all of your lights are working properly, cut the power again and then push the fixtures into the ceiling for your final installation. Each recessed lighting can may have a different way to install in the ceiling. All of them are extremely easy to install. Some have spring loaded tabs that hold the fixture in place and others have tabs that flare out and get tightened down with a screw driver.
 Some recessed lighting fixtures come with the trim and bulb included. Another option is to purchase a bulb and then your trim that is also purchased separately. There are benefits of both options. The first will have a cleaner look and finish but the second provides you with the ability to change light bulbs if you prefer a different kelvin temperature.
If you are going to select light bulbs, then I suggest reading how to choose the right light bulb for every room.
Finally, replace the current light switch with an LED compatible dimmer switch. Read how to choose a dimmer switch if you need help with this. A dimmer switch should always be used with recessed lighting because you will want to have the ability to adjust your brightness depending upon the need.
Related Questions
How much does it cost to install recessed lighting?
If you do the installation yourself, then your cost will be materials which on average will be about $35 per fixture including the wiring. If you have to hire an electrician, then you are likely to spend at least $150 per fixture.
How many recessed lights can be on one switch?
Each light switch will have a total watt rating. To determine how many recessed lights can be on one switch, you will need to determine how many watts each fixture is rated for and then divide that into the total watt rating for your switch.
Can you install recessed lights between floors?
Recessed lighting can be installed between floors, but you will need to use a shallow depth recessed lighting fixture since the room between the ceiling and the floor will be limited.
Do I need a permit to install recessed lighting?
Some towns may require a permit prior to installing recessed lighting. It would be a good idea to check with your local building department prior to starting your project. At minimum, you should understand and make sure you are completing the project in a way that adheres to the code.
Related Articles
How to Make Recessed Lighting Energy Efficient
I didn’t know that some areas require you to have a permit in order to install recessed lighting. My wife and I are planning having recessed lighting added to our living room. We’ll be sure to look into our area’s regulations first.
Stefan
I see that you are an electrical contractor. I am sure you know whether a permit is needed in your area.